
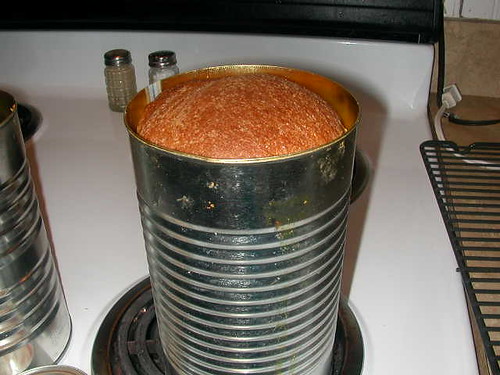
When Lee's parents were here last fall they bought me some cans for bread "pans". I didn't think I had any traditional bread pans, but turns out I did! I like baking the bread in these cans. Funny enough, Lee grew up thinking homemade wheat bread was always round. It's fun to have round bread! I still buy bread for the boys' lunches. Maybe this fall when 4/5ths of my kids are in school they'll be using homemade bread for sandwiches.
Grease your cans well!


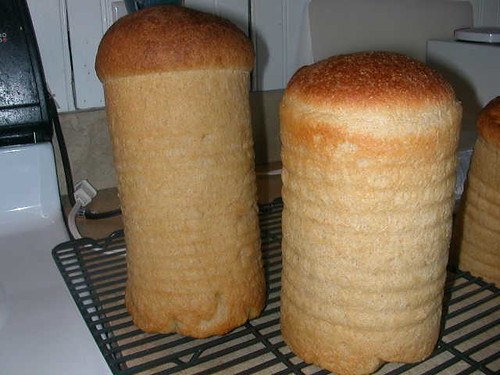
My bread also puffs up tall and makes a "mushroom" top. Let them cool upright. If you lay them on a cooling rack one side of your bread will be flat...which is fine too.
Here is my mother-in-law's recipe for whole wheat bread. Also, my sister-in-law Cindy added her changes too. I've used brown sugar and honey. So far I think I like how the honey one turns out better. I use whole wheat flour and have never used wheat gluten. Lee and I like how it turns out. Feel free to play around with the recipe like Cindy has--her comments are in the recipe! It's a good one!
WHOLE WHEAT BREAD –Raema Robertson (Cindy Robertson)
1. In the large BOSCH mixer bowl, using wire whips, mix the following ingredients [I am sure by hand or a Kitchen Aid would work great too!]:
1. In the large BOSCH mixer bowl, using wire whips, mix the following ingredients [I am sure by hand or a Kitchen Aid would work great too!]:
6 cups hot tap water
2/3 cup oil
2 Tablespoons salt
2/3 cup honey (or brown sugar) (I use brown sugar)
2. Add the following and continue mixing until batter thickens and is sticky (about 5-10 min): (I do the full
10 minutes but watch the Bosch as it may jump off the counter –that’s another story)
6 cups whole-wheat flour (I use 3 c. white flour and 3. c. whole wheat flour to create the gluten along
with 1/4c of Hodgson Mill Vital Wheat Gluten)
3 Tablespoons dry yeast (pour the yeast on top of the flour, not directly into the liquid)
3. Replace whips with bread dough hooks and proceed:
Add 3 cups whole-wheat flour and mix well
Add 1 to 2 more cups whole wheat flour and mix until dough pulls away from the bowl (try not to exceed
a total of 12 c. flour as dough must be soft enough to handle but not too sticky; the softer the better). If
you put too much flour, you can add more liquid to a “hole” in the dough. Knead with bread hooks for 12
minutes.
Pre-heat oven to 350º.
4. Divide dough into 6 parts and put into 6 well-greased (shortening) tall juice cans (your hands will get
goopy), and cover cans with a plastic bag or sheet of waxed paper. Let bread dough rise until double
in bulk (about 20-30 minutes). Bread is crumbly if you let it raise too long.
5. Carefully set cans right side up and center in the oven on the next to lowest rack (this will keep it from
growing into the heating element). Bake for 30 minutes for Texas [and Virginia!] (35-40 for Utah) Do not over bake. I put aluminum foil over them half way through baking to prevent over-browning the tops.
6. Let set 5 minutes. Remove loaves from the cans and lay loaves down on cooling rack for 20 minutes. If
loaves won’t come out of cans, just let them set for a minute or so and they will come out.
7. Seal loaves in plastic bags and store at room temperature or in the freezer. Don’t store loaves in
the refrigerator. Shelf life is about 3-4 days before bread will mold, but keep for several weeks in the
freezer. (I use the mushroom portion for a bowl of bread & milk with a little sprinkle of sugar )
Troubleshooting:
Dough doesn’t get thick and sticky in Step #2: Wheat doesn’t have enough gluten content to make
good bread. The solution is to add some white flour or add 3 Tablespoons of “Dough Enhancer” with
the yeast in step #2.
Bread is too crumbly—Dough rose too much in the pans. It is better to punch the dough down and let
it rise again than to bake it when it rose too high in the first place.
Bread is too dry—Used too much flour, cooked too long, not bagged soon enough after baking.
Doesn’t slice well—dough raised too much. Loaves were too hot. (use a good sharp serrated knife)
Hints/Tips:
1 cup hard white/red wheat = 1.5 c. flour
1 -#10 can ≈ 20 c. flour. (I used 9 c. and remaining flour fit back into the can w/lid)
For most bread recipes the water should be between 110-115º --this recipe doesn’t do that; it is very
hot tap water so you don’t want the yeast to touch the water or it will kill the yeast; Just be sure to add it
on top of the flour in Step #2.
I used 3 c. white flour (to make gluten) when I did step #2
I cover the pans with wax paper while the bread is rising in the cans. While they are cooking I add the
aluminum foil to prevent over- browning.
If you cook this bread in large juice cans it will appear with a mushroom shaped top upon baking. It’s
normal! There’s no crust with this method. You can also use a regular loaf pan; however remember
you want it to fill about 1/3 of it before rising.
The biggest tip is to keep trying. You will figure out what works best as you practice, practice, and
practice some more!
1 comment:
I'm excited to try this!!
Post a Comment