Friday, March 2, 2012

Time in a Bottle

It's no secret among my siblings that I like home canning.  My parents were avid home canners when I was young, more out of necessity than anything else, as were their parents before them.  I have very early memories of helping my dad out in the garden, and helping my mom with bottling green beans in the kitchen.  I was given the task of adding the salt (1 teaspoon) into each quart jar of green beans.  Serious stuff for a 3 year old.  We would can tomatoes, tomato juice, and applesauce.  It was a lot of work getting the food prepped and processed, but then we ate the fruits (ha ha) of our labors the rest of the year.  As kids we were always being sent down at dinnertime to the basement to bring up jars of green beans, tomatoes, diced turkey, pickles or fruit.

A few years ago, I watched an episode from Living Essentials (a BYU tv program) on home canning.  A lady from Utah State University was espousing all the virtues of home canning.  She said that having jars of food, prepared by you for your family, was like having "time in a bottle."  You put in the effort when you have some time, to prepare nutritious food for your family, then you bottle it up and have it later to use when you are rushed and crunched for time.  Talk about satisfaction!  The really cool thing is, you don't have to be an avid gardener or food scientist to take advantage of home canning.  You can prepare stuff from the grocery store.  You can take advantage of sales or take advantage of the time you have on hand.

A must have for every home canner, the Ball Blue Book is the best resource guide out there to show you the ins and outs of canning.  You also will need some basic tools, such as a waterbath canner for acidic foods, and a pressure canner for low acid foods, canning jars, lids and bands, a funnel and jar lifter.  These products can be found at Walmart or  your local grocery store.

Here's one of my favorite things to have on hand for days when I need something quick and nutritious for dinner:
  
Chicken Soup (recipe found in the Ball Blue Book)
This picture totally does not do this soup justice.  In each jar there is chicken, carrots, onions, celery, and broth, seasoned with salt and pepper.  With a jar of this soup I can make more than just chicken soup.  I can make chicken noodle soup (obviously).  I simple reheat the contents of the jar and add another jar of water and a few chicken bouillon cubes.  Then when it comes to a boil I add noodles and cook until done.  I also can use a jar of chicken soup for chicken and dumplings, same procedure as above, except I drop dumpling dough on top of the boiling mixture.  Or I can use rice for chicken and rice soup.  Or I can make chicken pot pie.  I thicken the broth with some flour, add a bag of frozen veggies and top it off with pie crust. Or I can thicken the soup to serve over rice as a gravy or for Hawaiian Haystacks.  The possibilities aren't endless, but they fit the bill.
I make a bigger batch than the recipe in the Ball Blue Book.  So here's my version for 9 quarts of soup (7 to process and 2 to eat for dinner):

Must Have Chicken Soup
1 10-lb bag chicken leg quarters (thighs and drumsticks) (cooked, skinned, deboned, coarsley chopped if desired)
1 bag carrots (peeled and sliced)
1 bag celery (cleaned and sliced)
3 large onions (peeled and diced)
8 quarts chicken stock or use bouillon cubes to equal that amount
Salt and pepper to taste
Bring everything to boil.  Simmer for 30 minutes.  Ladle into hot, sterile jars, leaving 1 inch head space.  Wipe rims and screw on lids with bands.  Process in a pressure canner at 10 lbs pressure for 90 minutes.  Let pressure drop naturally.

With a pressure canner, you need to be sure to follow the manufacturer's directions on how to use it, such as properly venting the canner etc.  In recipes it doesn't tell you that you need to let the pressure canner vent (steam comes out of the vent tube) for 10 minutes before placing the pressure control (the little weight that jiggles) over the vent tube.

This is what my Mirro canner book says:
"The U.S. Department of Agriculture recommends pressure canning as the only safe way to can meats, fish, poultry and all common vegetables.  Fruits and plain tomato products may be canned by the hot-water-bath method, but pressure canning them will save time and energy.  

Use a water-bath canner for pickles, jams, and jellies.  Do not blanch in a pressure canner.  Use a blancher or covered pot with wuitable basket.  

To can mixtures of foods (soups, stews, etc.) use the time required for the ingredient with the longest processing time.  Sometimes it is better to can ingredients separately (meat and vegetables, for example) and then combine them to heat for serving."   

Canning food for your family can be a bit hectic when you are rushing against the clock to get everything done, but then you really do have "time in a bottle" to use when you need it most.
~Lena

Wednesday, February 29, 2012

Granola YUM

 Here's another awesome granola recipe to try.  True to form, this recipe is changed from the original.   I got the original recipe from Deb's awesome ward cookbook.

1 large container quick oats (42 oz)
2 cups whole wheat flour
1 teaspoon cinnamon
1 teaspoon salt
1 cup brown sugar

Mix together in a large bowl, then add:
1 can sweetened condensed milk or honey
1 cup canola oil
1 teaspoon vanilla
Stir until everything is well coated.  Be sure to eat some of the balls that form.  My 3 year old likes to help me taste test.  Bake at 300 degrees for 30 minutes, stirring every ten minutes.  The granola should be turning golden brown when it's done.

Fun variations:
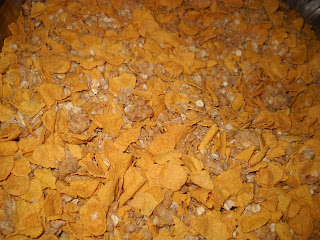
Stir in a box of corn flakes with the cooked granola, to simulate a popular breakfast cereal.  Or add nuts, dried fruit or coconut.  That's part of the fun with granola.  You can either eat as is or dress it up to suit your personal tastes. 
~Lena

Tuesday, February 28, 2012

Chocolate Pudding Garnish

For Family Home Evening last night, my 6 year old daughter made chocolate pudding.  Nothing special, just the instant boxed kind.  We used the blender to mix it up.  Much easier than using the whisk or beaters.  We topped it off with whipped topping (also the boxed kind, great stuff to have in your food storage) and grated chocolate for a garnish.  The garnish was the coolest part, I thought.  I had the kids ask Grandma for a Hershey's Kiss (since I'm all out of chocolate).  They came back with two, but I seriously only used one to top 9 dessert cups.  How awesome is that!  I just grated the chocolate kiss over each dessert with a cheese grater.  ~Lena   

Monday, February 20, 2012

Cinnamon Spice Muffins


Here is the latest muffin creation from my kitchen (adapted from Deb's basic muffin recipe).

Cinnamon Spice Muffins
4 cups flour (I used whole wheat)
1 cup sugar
2 Tablespoons baking powder
1 teaspoon salt
1 teaspoon cinnamon
1/2 teaspoon nutmeg
2 cups milk
2 eggs
1/3 cup canola oil

Sift together dry ingredients, then add the wet ingredients.  Mix just until everything's moist.  Spoon batter into muffin tins.  I love using my ice cream scoop for this!  I like to even the muffins out so I get 2 dozen muffins.  Bake at 400 degrees F. for about 15 minutes.  Sweet and spicy, quick and easy.  Perfect for a busy family like ours. ~Lena

Friday, February 10, 2012

Chocolate Chip Scones

My little piano student (with anticipation on his face) told me this morning that his family had chocolate chip scones out in the van.  He said they had little scones and medium-sized scones, but no big scones.  The scones sounded so delicious, that this afternoon, after I was done teaching, I promptly made my own version of chocolate chip scones.  If I were to have my druthers, I would have used mini chocolate chips, but since there were none to be had in the house, I made do with the regular chocolate chips that I had on hand.

They turned out just like I expected.  Very light, slightly sweet, chocolately biscuit.  These are English-type scones that are baked and are like a biscuit, not the scones that are fried (fried bread) from the West. 

Chocolate Chip Scones
4 cups flour (I used half white and half white wheat)
1/2 cup sugar
2 tablespoons baking powder
1/2 teaspoon salt
3/4 cup margarine (1 1/2 sticks)
2 eggs, beaten
1 cup evaporated milk
1 cup chocolate chips (I prefer milk chocolate)

Combine all the dry ingredients in a mixing bowl.  Cut in the margarine until the mixture is crumby.  Add eggs and milk. Mix until the mixture just comes together.  Add the chocolate chips, just until they get mixed in.  On a floured surface, pat out the dough until it is about 1/2 inch thick.  Cut with a floured cutter.  We chose a small heart shape to be in keeping with Valentine's day.  The dough is a bit sticky, so have flour on hand to dip the cutter in when needed.  Place cut scones on a baking sheet, so the scones are not touching.  Bake at 400 degrees F. for 8-15minutes or until the edges start to lightly brown.  The baking time will depend on the size of your scones.    Serve warm with our without glaze.

Glaze
1/2 cup powdered sugar
2 tablespoons evaporated milk.

Mix together until smooth.

Drizzle on scones after they have been out of the oven for a few minutes (the glaze then won't slide off as quickly).  MMmmmm!  This is a great snack for a February afternoon.
~Lena

Friday, February 3, 2012

Resolutions Resolved Part 2

The Budget
Do you have a dream that you want to accomplish or a place that you want to visit, but feel like you don't have the money to spare?  What do you want to do in this life?  Are you limited by your financial situation?
A lot of us will say, "I just need more money," when in fact, we may just need to reevaluate our spending.  You might be surprised when you do so.  So many of our "needs" are really just "wants."

I don't really have anything new to divulge about budgets.  One of the best resources that has helped me, is a booklet called "One For the Money" by Marvin J. Ashton.  He covers 12 points that can help us manage our money better.

1.  If we can pay a tenth of our income to God, who we cannot see, we will be better able to pay our "creditors" (those to whom we owe money) whom we can see with the 90% left to us.  Malachi 3:10 has such a wonderful promise, that each of us can try.  I have been blessed again and again for paying my tithing each month. 
"Bring ye all the tithes into the storehouse, that there may be meat in mine house, and prove me now herewith, saith the Lord of hosts, if I will not open you the windows of heaven, and pour you out a blessing, that there shall not be room enough to receive it." 

2.  You need to be in control of your money and how you spend it and not let your impulses and whims at the store dictate how you will spend your money. 

3.  Sometimes you have to say "no, we can't get that now."  It doesn't mean we won't ever get that item, we just can't get it now.  I love this Mormon Messages video on this topic with Elder Robert D. Hales.


4.  It is important to create a budget for each month, and then stick to it.  Emergencies will arise, and the budget may need to be adjusted, but as long as you stay within your means, and not go into debt for regular expenditures, you will succeed.

5.  Instead of giving the kids an "allowance", have them earn it, with the jobs they do around the house each week.  This teaches them to earn money by working for it.

6.  Let kids spend their own money.  If they make mistakes in  how they spend it, let them make mistakes.  It's all part of the learning process. 

7.  Set family goals, where everyone can contribute.  When I was in middle school, we planned a trip to Disneyland as part of our summer vacation.  To help us achieve our goal, we kids decided to make lunches to take to school, instead of buying school lunch.  Then the money that we saved, we put into a ceramic "well" that Mom had above the sink.  I remember my lunches not being all that great that year, probably because I was the one who made them, but I also remember the satisfaction of working together as a family for a shared goal, which we were able to achieve.
  
8.  Learning new skills will not only bless you, it can help you bless the lives of others.  And in the event of a job loss, having up to date skills makes you more employable.

9.  Work towards paying off your mortgage early.  Think of the security owning a home will give you and your family!

10. If your husband, or you, were to die tomorrow, what would be the source of income for your family?  Having insurance isn't just nice, it's a necessity.  Two of my aunts lost husbands at relatively young ages.  They had young children at home to care for.  Term life insurance is inexpensive and easy to get, especially if you are in your 20's or 30's.  I say get as much as you can on the breadwinner in your family.  I don't want to have to run out and get a job if my husband dies.  I have young children at home, and I would prefer to stay at home until they leave for college.
  
11. Become educated on how your investments, bank accounts etc. work.

12. Be prepared with food storage and emergency preparedness.  These are a couple blog posts in and of themselves.  If you have food storage and emergency supplies, when disaster strikes, at least you have something to eat and the things you need to take care of your family.

Another excellent resource is providentliving.org    Here you can find the basics to get started, or the pep talk you need to continue living within your means.

It has been very exciting to work towards these goals with our family.  Becoming debt free, living within our means and working towards paying off our house and saving for college and retirement is an exciting journey we can all take.  When we try to live providently, meaning-in the Lord's way-then the Lord will bless us and our families, and we will find peace even in the midst of the storms that swirl around us.

Wednesday, January 25, 2012

Italian Meatball Soup

    
Recipe adapted from Our Best Bites

This recipe is so easy, my 9 year old daughter can make it.  You can throw everything into a slowcooker and let it cook all day when you are busy. Just cook the noodles separate and stir them in when you are ready to eat.

Italian Meatball Soup
1 can diced tomatoes
1 onion, chopped
1 green or red pepper chopped
3 carrots, peeled and sliced, or 1 can sliced carrots
2 cups spaghettie sauce
4 cups water
4 beef or chicken boullion cubes
1 recipe of meatballs (see below)
1 16 oz. package of pasta (your choice)

Put everything in the crockpot and cook on low all day, or simmer on the stovetop 30 minutes before you eat.  During the last 10 minutes of cooking, add the pasta, cook until the pasta is as tender as you like it.  Serve with yummy garlic bread.

My Meatballs or Meatloaf or Hamburgers (oh my!)
1 pound ground beef
1 medium onion, diced (diced green pepper is good too, but optional)
1 cup bread crumbs (I like to use my homemade wheat bread.  I pulse the bread in my blender to make crumbs).
1/3 cup milk
1 egg
1 Tbs. Worcestershire sauce
2 or 3 Tbs. ketchup (just squirt some in)
1 tsp. mustard (optional)
1/2 tsp garlic powder (or to taste)
 Salt and pepper to taste (obviously you won't taste the raw meat, I hope!  Just sprinkle some on.)

Mix everything together.  If the mixture is too dry, add a little more milk.  If it is too wet, add more breadcrumbs.  If making meatballs, form into balls and place on wire racks on top of a baking sheet.  Bake at 350 degrees for 20-25 minutes or until done.  You can use the meatballs at this point, or cool and place into a freezer bag and freeze for up to 3 or 4 months.

If you are making a meatloaf, put the mixture into a loaf pan and bake at 350 for 25-30 minutes.  It will shrink as the fat cooks out.  Drain off the fat.  You can serve immediately, or cool it and wrap it to freeze.  I love to freeze it and then I have a quick meal.  Simply thaw in the microwave and serve.  Instant potatoes work well as a side dish when you are crunched for time.

If you are using this mixture for hamburgers, scoop up the mixture using an ice cream scoop, to make uniform patties.  I put the patties on a baking sheet and flash freeze them.  When they are firm, I bag them up, then pull them out when I need them.  Cook as you would frozen burgers.

I like making this mixture when I have 3-5 lbs. of hamburger to deal with.  I can prep a lot of meals at once with meatballs, meatloaf and hamburger patties, ready to go in my freezer.
~Lena

Monday, January 23, 2012

Resolutions Resolved

January is about gone, and it's been a pretty mild one at that, as far as the weather has been in these parts.  Have you stuck to the resolutions made three weeks ago?  Many of you may have resolved to lose weight, stick to a budget or get organized.  We can probably all do better in these areas of our lives. 
Here are some of my tips for losing weight.  Check back next week for tips on sticking to a budget.

Lose Weight:
I may not be a weight-loss expert, but I have been on the gain weight/lose weight roller coaster for the last 11 years with having 6 kids.  I'm happy to say that so far I've been pretty successful at losing the baby weight each time.  Fortunately, I haven't had any problems that would make it harder for me to lose the weight.  Here are some tips that have worked for me during this time of my life:

#1. Always eat breakfast, and don't wait a couple of hours to get around to it.  After I get up and get dressed, I head to the kitchen.  I may not have time to sit down, but I'll at least eat a piece of toast or a cup of yogurt, and then later eat something else.  Eating breakfast jumpstarts your metabolism for the day, giving you the energy to get going.  Some people like to exercise first and then eat.  I don't agree with this practice.  At least eat a piece of fruit or something, before you exercise.  Once again, this will boost your metabolism.  After sleeping all night, you need to break the fast that your body has had while sleeping. 

#2.  Drink LOTS of water.  This is probably obvious, but there are so many health benefits to drinking lots of water.  Your body is able to function more easily when you've had plenty of healthy fluids.  Stay away from soda pop and limit your juice intake.  These days I'm not a fan of either pop or juice.  Water and milk are my beverages of choice.  Why waste calories on a drink?  I'm getting thirsty.  Hang on while I go get a drink. . .Ahh, I love water. 

#3.  Get Moving!!!  Aim to exercise 3-5 days a week, 30-60 minutes each day.  Hate to exercise?  Find something that you like.  These days there are lots of choices.  I love aerobics, weights, kickboxing, dancing, and walking.  Since baby #6, it's been hard to get back into my regular exercise routine.  Fortunately (or not, depending on my mood), we have a dog who needs daily walks.  If I can get my two miles in for the day, I'm good.  One of my favorite video instructors is Deni Preston.  She has a show, Total Body Workout on byutv.org.  Check her out.  It might take a little while to get used to her instructions, but her step aerobics and yoga workouts are really good.  She also incorporates weights, bands, exercise balls, etc. into her routines.  Very fun.  If you still have a hard time, get an exercise bike or elliptical trainer and use it while watching your favorite shows.  Then you don't have to think about how much you hate exercising and your body will thank you. 

#4.  Change something in your diet.  You don't need to change everything, and you don't need to do anything fadish.  If you eat white bread, change to wheat.  Eat whole grain cereals for breakfast (my personal favorite is bran flakes).  If you use vegetable oil in your baking, switch to canola oil.  Limit fats, and eat more fruits and veggies.  Make more meals from scratch instead of using prepared foods.  This will not only help your health, it will also be good for your budget.

~Lena 


.

Sunday, January 22, 2012

Whole Wheat Bread

Though my sister Lena has been encouraging me to do this for several years, I just started making my own wheat bread--regularly. I bought 50 pounds of wheat, pulled out my wheat grinder a few weeks ago and I'm still baking bread!  It's been fun using the wheat flour in other things took like brownies, pumpkin muffins and pancakes.

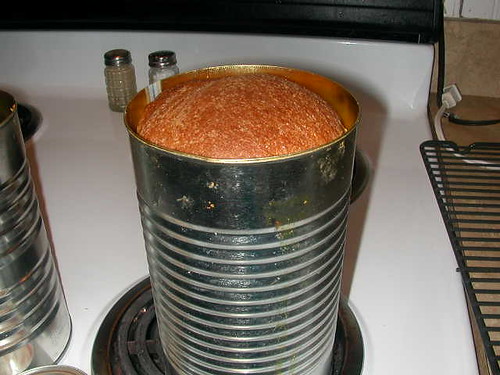
When Lee's parents were here last fall they bought me some cans for bread "pans".  I didn't think I had any traditional bread pans, but turns out I did!  I like baking the bread in these cans. Funny enough, Lee grew up thinking homemade wheat bread was always round. It's fun to have round bread!  I still buy bread for the boys' lunches.  Maybe this fall when 4/5ths of my kids are in school they'll be using homemade bread for sandwiches.

Grease your cans well!
Jan 7 2012 making bread

Jan 17 2012

Jan 17 2012 (2)

My bread also puffs up tall and makes a "mushroom" top.  Let them cool upright.  If you lay them on a cooling rack one side of your bread will be flat...which is fine too.
Jan 17 2012 (3)

Here is my mother-in-law's recipe for whole wheat bread.  Also, my sister-in-law Cindy added her changes too.  I've used brown sugar and honey.  So far I think I like how the honey one turns out better. I use whole wheat flour and have never used wheat gluten. Lee and I like how it turns out. Feel free to play around with the recipe like Cindy has--her comments are in the recipe!  It's a good one!

WHOLE WHEAT BREAD –Raema Robertson (Cindy Robertson)

1. In the large BOSCH mixer bowl, using wire whips, mix the following ingredients [I am sure by hand or a Kitchen Aid would work great too!]:

6 cups hot tap water
2/3 cup oil
2 Tablespoons salt
2/3 cup honey (or brown sugar) (I use brown sugar)

2. Add the following and continue mixing until batter thickens and is sticky (about 5-10 min): (I do the full
10 minutes but watch the Bosch as it may jump off the counter –that’s another story)
6 cups whole-wheat flour (I use 3 c. white flour and 3. c. whole wheat flour to create the gluten along
with 1/4c of Hodgson Mill Vital Wheat Gluten)
3 Tablespoons dry yeast (pour the yeast on top of the flour, not directly into the liquid)

3. Replace whips with bread dough hooks and proceed:
Add 3 cups whole-wheat flour and mix well
Add 1 to 2 more cups whole wheat flour and mix until dough pulls away from the bowl (try not to exceed
a total of 12 c. flour as dough must be soft enough to handle but not too sticky; the softer the better). If
you put too much flour, you can add more liquid to a “hole” in the dough. Knead with bread hooks for 12
minutes.
Pre-heat oven to 350º.

4. Divide dough into 6 parts and put into 6 well-greased (shortening) tall juice cans (your hands will get

goopy), and cover cans with a plastic bag or sheet of waxed paper. Let bread dough rise until double
in bulk (about 20-30 minutes). Bread is crumbly if you let it raise too long.

5. Carefully set cans right side up and center in the oven on the next to lowest rack (this will keep it from
growing into the heating element). Bake for 30 minutes for Texas [and Virginia!] (35-40 for Utah) Do not over bake. I put aluminum foil over them half way through baking to prevent over-browning the tops.

6. Let set 5 minutes. Remove loaves from the cans and lay loaves down on cooling rack for 20 minutes. If
loaves won’t come out of cans, just let them set for a minute or so and they will come out.

7. Seal loaves in plastic bags and store at room temperature or in the freezer. Don’t store loaves in
the refrigerator. Shelf life is about 3-4 days before bread will mold, but keep for several weeks in the
freezer. (I use the mushroom portion for a bowl of bread & milk with a little sprinkle of sugar )

Troubleshooting:
Dough doesn’t get thick and sticky in Step #2: Wheat doesn’t have enough gluten content to make
good bread. The solution is to add some white flour or add 3 Tablespoons of “Dough Enhancer” with
the yeast in step #2.
Bread is too crumbly—Dough rose too much in the pans. It is better to punch the dough down and let
it rise again than to bake it when it rose too high in the first place.
Bread is too dry—Used too much flour, cooked too long, not bagged soon enough after baking.
Doesn’t slice well—dough raised too much. Loaves were too hot. (use a good sharp serrated knife)

Hints/Tips:
1 cup hard white/red wheat = 1.5 c. flour
1 -#10 can ≈ 20 c. flour. (I used 9 c. and remaining flour fit back into the can w/lid)
For most bread recipes the water should be between 110-115º --this recipe doesn’t do that; it is very
hot tap water so you don’t want the yeast to touch the water or it will kill the yeast; Just be sure to add it
on top of the flour in Step #2.
I used 3 c. white flour (to make gluten) when I did step #2
I cover the pans with wax paper while the bread is rising in the cans. While they are cooking I add the
aluminum foil to prevent over- browning.
If you cook this bread in large juice cans it will appear with a mushroom shaped top upon baking. It’s
normal! There’s no crust with this method. You can also use a regular loaf pan; however remember
you want it to fill about 1/3 of it before rising.

The biggest tip is to keep trying. You will figure out what works best as you practice, practice, and
practice some more!

Thursday, January 12, 2012

Snowman Craft

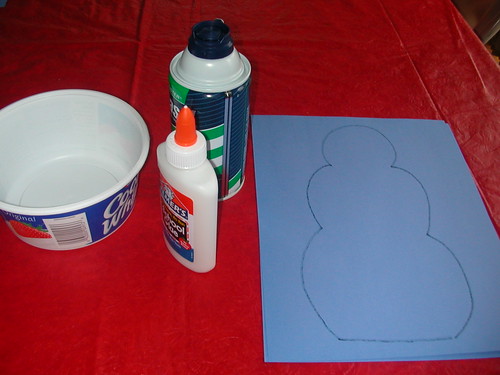
Once a week I check up with the 1st grade teachers here at the local elementary school to see if there are any craft projects they would like me to help out with.  A few weeks ago one teacher had me prep some construction paper for snowmen by drawing a snowman outline on each one.  She then told me that she was going to make "snow" by mixing shaving cream and glue.  While the mixture is still wet, one can add buttons, eyes, nose, etc.  Because the glue is in the mixture it will harden (to an extent) and dry.  I thought this sounded fun and wanted to try it with my girls.

We did just that today.  My nephew was in town and I thought he would enjoy it too.  To make the "snow" mix two parts shaving cream and one part glue. 
Jan 12 2012 Snowman Craft

Gather items to decorate your snowman.  At school Cal used buttons and pompoms.  I used what we had at home.
Jan 12 2012 Snowman Craft (2)

I did make a special purchase...some foam brushes.  There was only one brush at home and I think it was destroyed in its last use.  It was a gorgeous day today (high 50s) so the kids and I took a walk to the local ACE Hardware.  I love that I can walk to so many businesses here in my small town!
Jan 12 2012 Snowman Craft (3)

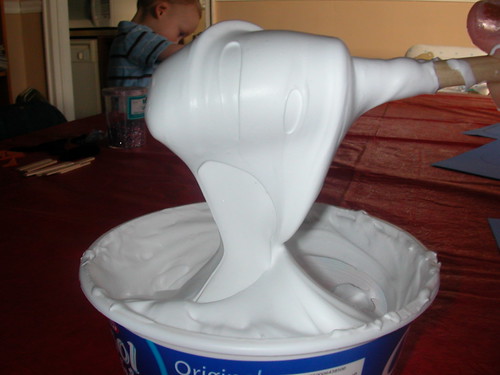
I made too much mixture for four kids.  I added about 3/4 a bottle of Elmer's glue in it.  I am sure my ratio of 2 to 1 was off, but I think it still worked.
Jan 12 2012 Snowman Craft (4)

As I mixed the glue and shaving cream together it became somewhat elastic.
Jan 12 2012 Snowman Craft (5)

Now to create!
Jan 12 2012 Snowman Craft Reed Shanna Haley

Jan 12 2012 Snowman Craft Haley

Jan 12 2012 Snowman Craft Shanna

Jan 12 2012 Snowman Craft Reed

Jan 12 2012 Snowman Craft Elden

Jan 12 2012 Snowman Craft Reed Elden

Jan 12 2012 Snowman Craft Elden Shanna Haley Reed

Jan 12 2012 Snowman Craft Shanna (2)

Showing off the finished product...
Jan 12 2012 Snowman Craft Elden (2)

Jan 12 2012 Snowman Craft Shanna (3)

Jan 12 2012 Snowman Craft Haley (3)

Jan 12 2012 Snowman Craft Reed (2)

What winter crafts have you been making?  We'd love to hear!  Happy New Year!